
What Is an IPA File? Definition, Structure, and How to Create, Install, and Test One
An IPA file is the iOS app package format used to distribute and install apps on iPhones and iPads. Learn what it contains, how to create one, and how to test it.
Yuvan Sundrani · 12 min read
autosana.ai
.png)
An IPA file is the packaged file format used to distribute iOS applications. IPA stands for iOS App Store Package. It is the Apple equivalent of an APK file on Android.
Every time you download an app from the App Store, your device is downloading and installing an IPA file in the background. Most users never see it directly. But for developers, testers, and teams that ship iOS apps, the IPA file is a critical part of the build, test, and release workflow.
What is an IPA file?
An IPA file is a compressed archive that contains everything an iOS device needs to install and run an application. It holds the app's compiled code, resources like images and fonts, configuration metadata, and a digital code signature that proves who built it.
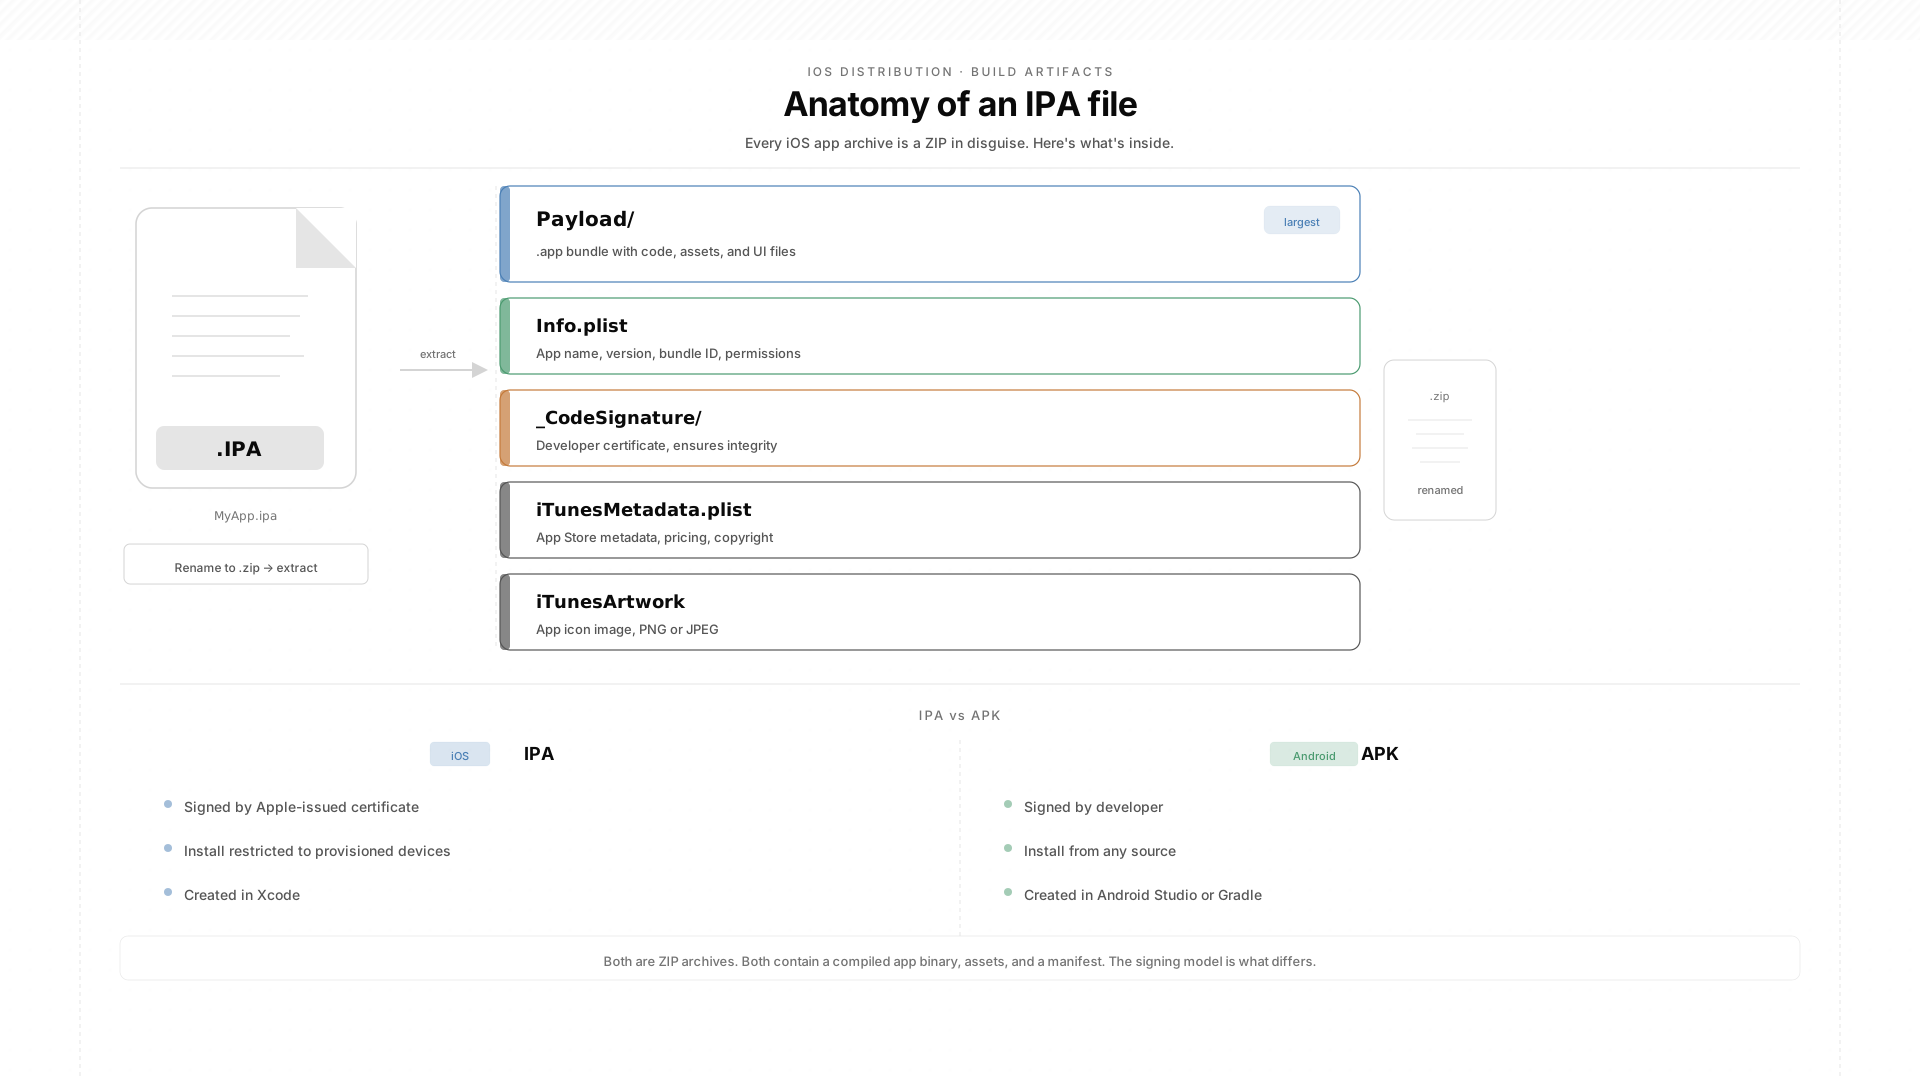
Under the hood, an IPA file is a renamed ZIP archive. If you change the file extension from .ipa to .zip, you can extract it and browse the contents on any computer. The IPA file format follows a standard ZIP structure, but the contents inside are specific to Apple's ecosystem.
IPA files can only run on iOS and iPadOS devices. They require a valid code signature from Apple, which means you cannot simply copy an IPA file to an iPhone and run it without going through Apple's distribution channels or developer tools.
What is inside an IPA file?
When you extract an IPA file, you will find a consistent structure that Apple requires for all iOS applications.
Payload folder. This is the main directory inside the IPA. It contains the .app bundle, which holds the compiled executable code, all resource files (images, sounds, fonts), and storyboard or nib files that define the user interface. This is the heart of the application.
Info.plist. An XML configuration file that tells the device everything it needs to know about the app: its name, version number, bundle identifier, required permissions, supported device types, and minimum iOS version. This file is what the operating system reads first when installing the app.
Code signature. A digital certificate that proves the app was built by a verified developer and has not been tampered with since it was signed. Apple requires every IPA file to be signed before it can be installed on any device. The type of signature determines where and how the app can be distributed.
iTunesMetadata.plist. Contains metadata about the app as it appears in the App Store: the developer's name, copyright information, release date, and pricing. This file is present in IPA files downloaded from the App Store but may not exist in development builds.
iTunesArtwork. The app's icon image, stored as a PNG or JPEG file. This is the icon that appeared in older versions of iTunes when managing apps on a computer.
IPA vs APK: how iOS and Android package apps differently
Both IPA and APK files serve the same purpose: they package a mobile application into a single file for distribution and installation. But there are important differences in how each platform handles them.
File format. Both are ZIP archives with different extensions. An IPA file contains a .app bundle with compiled ARM binaries. An APK file contains a classes.dex file with Dalvik/ART bytecode, plus an AndroidManifest.xml and resource directories.
Installation restrictions. Android allows APK installation from any source by enabling "Install from unknown sources" in settings. iOS does not. Every IPA file must be signed with a valid Apple certificate, and installation is restricted to the App Store, TestFlight, enterprise distribution, or developer provisioning.
Code signing. APK files are signed by the developer, and Android verifies the signature but does not restrict who can sign. IPA files must be signed with certificates issued by Apple through the Apple Developer Program. This means Apple controls who can distribute iOS apps.
Testing implications. You can test an APK on any Android device by copying the file and tapping install. Testing an IPA file requires either a provisioned device registered in your developer account, a TestFlight build, or an enterprise certificate. This makes the IPA testing workflow more complex and is why real device testing platforms exist.
Common uses for IPA files
App Store distribution. When you submit an app to the App Store through App Store Connect, you upload an archive that Apple processes into the IPA files users download. This is the standard distribution path for consumer iOS apps.
Development and testing. During development, teams generate IPA files from Xcode to test unreleased builds on real devices. This is the most common use case outside of the App Store. The IPA file lets testers install a pre-release version of the app without it being publicly available.
Beta testing via TestFlight. Apple's TestFlight service distributes IPA files to beta testers. Developers upload the build to App Store Connect, and TestFlight handles distribution, installation, and feedback collection for up to 10,000 external testers.
Enterprise distribution. Companies with an Apple Developer Enterprise Program membership can distribute IPA files directly to employees without going through the App Store. This is used for internal business apps that are not intended for the public.
Sideloading. Advanced users sometimes install IPA files manually using third-party tools like AltStore or Sideloadly. This requires a computer, an Apple ID, and re-signing the app every 7 days for free accounts.
How to create an IPA file
IPA files are created through Xcode, Apple's development environment. The process involves archiving your project and then exporting it with the appropriate distribution method.
Open your project in Xcode. Select a real device or "Any iOS Device" as the build target. Then select Product, then Archive from the menu. Once the archive completes, the Organizer window opens. Select the archive and click Distribute App.
Xcode presents distribution options: App Store Connect, Ad Hoc, Enterprise, or Development. Each option produces an IPA file signed with a different type of certificate. The choice determines where the IPA can be installed.
For testing purposes, ad hoc distribution creates an IPA that can be installed on specific devices registered in your developer account. Development distribution is similar but intended for debugging. Both require the target device's UDID to be listed in the provisioning profile.
For a detailed walkthrough of building iOS apps for cloud testing environments, see the app build guide.
How to open an IPA file
You cannot double-click an IPA file to run it on a computer. But you can inspect its contents by renaming it.
Change the file extension from .ipa to .zip. Then extract it using any archive utility: Archive Utility on Mac, 7-Zip or WinZip on Windows, or the unzip command in a terminal. The extracted folder will contain the Payload directory, metadata files, and the .app bundle.
Inside the .app bundle, you will find the compiled binary, all resource files, the Info.plist, and the code signature directory. The binary itself is encrypted with Apple's FairPlay DRM on App Store builds, so you cannot reverse-engineer it from a production IPA. Development and ad hoc builds are not encrypted.
How to install an IPA file
The installation method depends on the type of IPA file and how it was signed.
TestFlight. The simplest path for beta testing. Upload the IPA to App Store Connect, distribute through TestFlight, and testers install it directly from the TestFlight app on their devices. No UDID registration required for external testers.
Xcode. Connect a provisioned device to your Mac via USB. Open the Devices and Simulators window in Xcode. Drag the IPA file onto the device entry. Xcode installs the app if the device's UDID is in the provisioning profile.
Apple Configurator 2. A Mac utility for managing multiple devices. Connect the device, open Apple Configurator, and drag the IPA file onto the device icon. Useful for enterprise deployment across multiple devices.
Finder (macOS Catalina and later). Connect the device via USB. Open Finder and select the device in the sidebar. Drag the IPA file onto the Finder window. This replaced the iTunes workflow for modern macOS versions.
Third-party tools. AltStore, Sideloadly, and 3uTools can install IPA files without requiring the device's UDID in a provisioning profile. These tools re-sign the app with your Apple ID, but free accounts require re-signing every 7 days.
Code signing and provisioning: what matters for testing
Code signing is the part of the IPA workflow that causes the most confusion during testing. Understanding the signing types prevents the most common installation failures.
Development signing. Used during active development. The IPA can only be installed on devices whose UDIDs are registered in the provisioning profile. Limited to 100 devices per device type per year.
Ad hoc signing. Used for distributing test builds to a known set of devices. Same 100-device limit as development. The IPA can be installed without Xcode, but the device must be registered.
Enterprise signing. Available only to organizations with an Apple Developer Enterprise Program membership. No device limit. No UDID registration. But the certificate can be revoked by Apple if misused, which immediately disables every app signed with it.
App Store signing. Used for public distribution through the App Store. The IPA is uploaded to App Store Connect and re-signed by Apple during processing. Users install it through the App Store app.
For mobile app testing workflows, the signing type determines which devices can run the build and how the IPA gets onto those devices. Cloud testing platforms handle this complexity by accepting development or Ad Hoc signed builds and installing them on their own provisioned device fleet.
How IPA files fit into CI/CD and automated testing
In a modern iOS development workflow, IPA files are generated automatically by CI/CD pipelines, not manually by developers.
A typical flow: a developer pushes code to GitHub. A CI job builds the project using xcodebuild, archives it, and exports the IPA with the correct signing identity. The IPA is then uploaded to a testing platform, and automated tests run against the build on real devices.
This is where the GitHub Action for app uploads comes in. It automates the step between "CI built the IPA" and "tests run against it." Every commit gets a build. Every build gets tested. No manual file transfers, no dragging IPA files into Xcode.
The pipeline also handles signing automatically. CI systems like GitHub Actions and Bitrise can store signing certificates and provisioning profiles as encrypted secrets, apply them during the build, and produce a correctly signed IPA without developer intervention.
How Autosana handles IPA file testing
Autosana accepts IPA files directly. Upload a development or Ad Hoc signed build, and we install it on real iOS devices in our cloud. No UDID management, no provisioning profile headaches.
Once the build is uploaded, you write test flows as natural-language instructions. The agent opens the app, navigates by intent, and verifies outcomes. When the UI changes between builds, the agent adapts. A button that said "Submit" in version 1.2 and "Confirm" in version 1.3 does not break the test.
For CI/CD workflows, the GitHub Action uploads the IPA automatically after every build. Automations trigger the relevant test suites, and results with session replay videos post back to the pull request.
The entire loop from code push to test results requires no manual IPA handling. The developer pushes code. CI builds the IPA. The GitHub Action uploads it. Autosana runs the tests. Results appear on the PR. The IPA file is the artifact that moves through this pipeline, but no human needs to touch it after the initial setup.
Conclusion
Every feature branch produces a build. Every build produces an IPA. If a human has to drag that file into Xcode, pick a device, and run through the app manually, your testing bottleneck is not the code.
It is the file transfer. Wire your CI to build the IPA, upload it automatically, and trigger test flows on real devices without anyone touching the file. The IPA is an artifact that should move through a pipeline, not sit in a Slack thread waiting for someone to download it.
.png)
FAQ
What does IPA stand for?
IPA stands for iOS App Store Package. It is the file format Apple uses to package and distribute iOS applications. The name reflects its original purpose as the delivery format for apps downloaded from the App Store.
Is an IPA file the same as an APK?
They serve the same purpose but for different platforms. An IPA file packages an iOS application. An APK file packages an Android application. Both are ZIP archives containing compiled code, resources, and metadata, but their internal structures and installation requirements are different.
Can you install an IPA file on Android?
No. IPA files contain compiled code for Apple's ARM-based processors and rely on iOS frameworks. They cannot run on Android devices. Android uses APK or AAB files.
How do you open an IPA file on a computer?
Rename the file extension from .ipa to .zip, then extract it with any archive utility. You will see the Payload folder containing the .app bundle, plus metadata files like Info.plist and iTunesMetadata.plist. The compiled binary inside is encrypted on App Store builds but readable on development builds.
Do you need a Mac to create an IPA file?
Yes. IPA files are created through Xcode, which only runs on macOS. The archive and export workflow requires Xcode's build tools and access to Apple's code signing infrastructure. CI services like GitHub Actions can use macOS runners to automate this.
Why does my IPA file fail to install?
The most common causes are provisioning profile mismatches (the device's UDID is not registered), expired signing certificates, or iOS version incompatibility (the app requires a newer iOS version than the device runs). Check the code signing settings in Xcode and verify the device is included in the provisioning profile.
Can you test an IPA file without a real device?
You can test on the iOS Simulator in Xcode, but the Simulator runs x86/ARM Mac builds, not IPA files. Simulators do not support push notifications, camera access, or certain hardware-specific behaviors. For accurate testing, you need real iOS devices, either physical hardware or a cloud device platform.
What is the difference between Ad Hoc and Development IPA files?
Both are signed for a limited set of registered devices. Development builds include debugging symbols and can be attached to Xcode's debugger. Ad Hoc builds are optimized release builds without debug symbols, intended for pre-release testing by team members or stakeholders who do not use Xcode.