
Flutter Integration Testing: Setup, Examples and Tools
A practical guide to Flutter integration testing: integration_test setup, native dialogs, Patrol vs Autosana, worked failure examples and CI for iOS and Android.
- Written by
- Gautam Agarwal
- Read time
- 12 min read
- Published
Quick answer: Flutter integration testing runs your complete app on a device, emulator or simulator and checks full user journeys, which the Flutter docs also call end to end testing or GUI testing. It proves that your widgets, state, platform code and backend work together in one running app.
Widget tests check each brick. Integration tests check that the finished model stands up when someone picks it up, on a real phone, with real permission prompts and real network calls.
Key Takeaways
- Flutter has three test layers: unit tests for logic, widget tests for single widgets, and integration tests for the whole app.
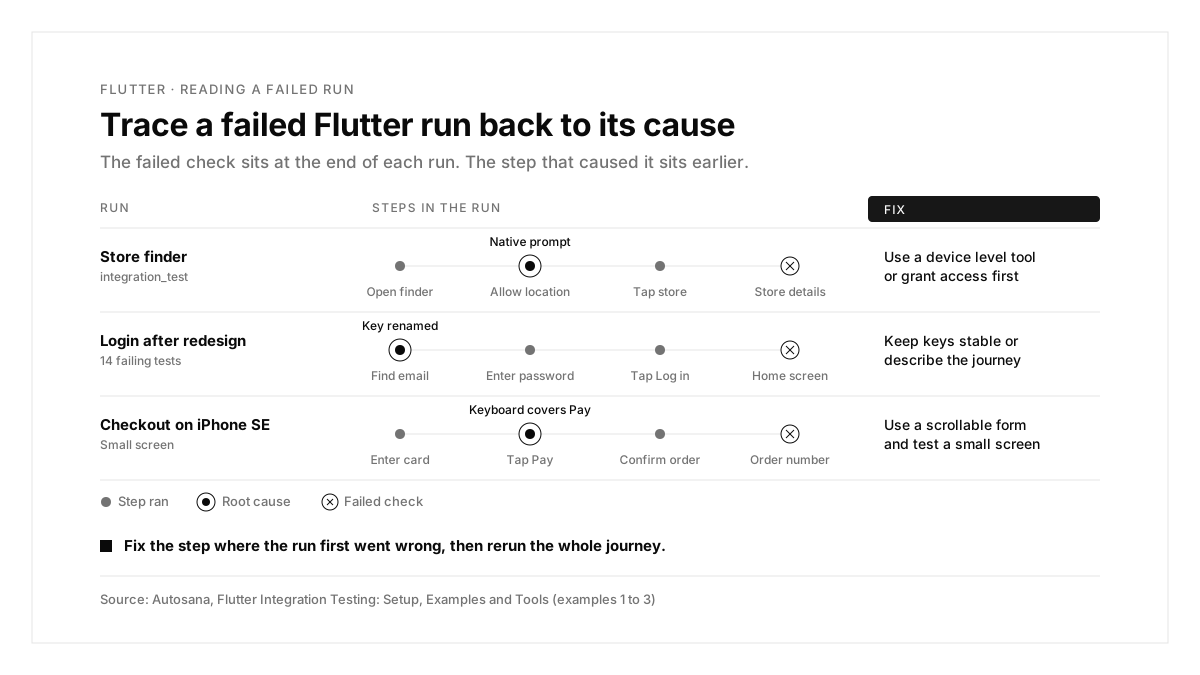
- The official integration_test package runs on the target device and uses flutter_test APIs, yet it stops at native platform UI.
- Permission dialogs, notifications and platform views need a tool that drives the device, such as Patrol or Autosana.
- Start with 3 to 5 vital journeys: sign up, login, the core action and payments.
- Firebase Test Lab spreads integration_test suites across many devices, and Flutter web and desktop apps run the same tests through ChromeDriver and xvfb.
- Autosana runs flows on Flutter builds for iOS and Android: a simulator Runner.app, an .apk, or an .ipa for real iPhones.
What is Flutter integration testing?
Flutter integration testing checks a complete user journey inside a running app. According to the Flutter integration testing docs, unit and widget tests validate individual classes, functions and widgets, while integration tests verify the behavior of the complete app.
Every integration test follows the same three steps:
- Build. Compile the app for a simulator, emulator or phone.
- Drive. Launch it and perform the user's actions.
- Assert. Confirm the expected screen, text or state appears.
Unit, widget and integration tests compared
| Test type | What it checks | Runs on | Tool |
|---|---|---|---|
| Unit | A function, method or class | The Dart VM on your machine | test / flutter_test |
| Widget | One widget's rendering and interactions | A test environment on your machine | flutter_test |
| Integration | The complete app, end to end | A device, emulator or simulator | integration_test, Patrol, Autosana |
The Flutter testing overview describes all three layers. Unit tests stay fast and cheap, so keep most of your logic there; this guide on emulators vs real devices covers where the rest should run. Integration tests cost more per run, so spend them on journeys that make or lose money; this guide to native mobile app testing shows how teams split the layers.
Where Flutter apps break that widget tests miss
| Area | What can break | Why widget tests miss it |
|---|---|---|
| Plugins and platform channels | Camera, payments, storage and push behave differently on a device | Widget tests replace them with fakes |
| Native platform UI | Permission dialogs, notifications and platform views | They sit outside the widget tree |
| Keyboards and safe areas | Inputs hidden on short screens or under the notch | The test environment lacks a real keyboard and notch |
| Flavors and config | A test build talks to the wrong backend | Widget tests skip the build system |
| Performance | Jank on scroll heavy screens | Speed only shows on a real device |
Why integration testing matters for Flutter apps
Flutter draws its own UI, and the OS draws the rest. Permission prompts, notifications, the share sheet and embedded web or map views belong to iOS and Android, outside your widget tree.
Plugins call native code. Camera, payments, push and storage plugins run platform code that widget tests replace with fakes.
Two platforms, two sets of surprises. Keyboards, safe areas and back navigation differ between iOS and Android.
Ways to run Flutter integration tests
| Where tests run | How | Best for |
|---|---|---|
| A connected device or simulator | flutter test integration_test | Daily development |
| Chrome | flutter drive --driver=test_driver/integration_test.dart --target=integration_test/app_test.dart -d web-server, with ChromeDriver running | Flutter web apps |
| Linux desktop in CI | flutter test integration_test -d linux, wrapped in xvfb-run so an X server exists | Desktop apps |
| Firebase Test Lab | Your integration tests across many Android and iOS devices | Device coverage |
| Autosana | A written flow against your uploaded build, in the cloud or locally | Journeys that cross native UI and run on every PR |
The Flutter docs list Firebase Test Lab as the way to run integration_test suites across many devices, and they cover web and desktop runs in the same guide. Older suites built on flutter_driver should move to integration_test; Flutter publishes a migration guide for that switch.
integration_test vs Patrol vs Autosana
| integration_test | Patrol | Autosana | |
|---|---|---|---|
| Who makes it | The Flutter team, inside the SDK | A third party package | Autosana |
| Test format | Dart with flutter_test APIs | Dart, with native automation added | A written flow, in YAML or the dashboard |
| Finding elements | Finders such as find.byKey and find.text | Flutter finders, plus native automation | The agent reads the live screen |
| Native dialogs and notifications | Outside its reach | Supported | Push tested end to end, from permission to tap |
| Pull request feedback | Your CI job and reporter | Your CI job and reporter | A PR comment with videos plus a GitHub Check |
| Cost | Free, part of the SDK | Free package | Free tier, then paid plans |
The Flutter docs describe Patrol as a popular third party package that can interact with permission dialogs, notifications and platform views. Pick integration_test for pure Flutter journeys, Patrol when you want Dart tests that reach native UI, and Autosana when you want flows that adapt to UI changes and report on every pull request.
How to set up Flutter integration testing
Step 1: Add integration_test and write a test
flutter pub add "dev:integration_test:{sdk: flutter}"
```dart
// integration_test/login_test.dart
import 'package:flutter/material.dart';
import 'package:flutter_test/flutter_test.dart';
import 'package:integration_test/integration_test.dart';
import 'package:my_app/main.dart' as app;
void main() {
IntegrationTestWidgetsFlutterBinding.ensureInitialized();
testWidgets('login shows home', (tester) async {
app.main();
await tester.pumpAndSettle();
await tester.enterText(find.byKey(const ValueKey('email')), 'test@example.com');
await tester.enterText(find.byKey(const ValueKey('password')), 'secret123');
await tester.tap(find.text('Log in'));
await tester.pumpAndSettle();
expect(find.text('Home'), findsOneWidget);
});
}
```
Run it on a connected device or booted simulator with flutter test integration_test/login_test.dart.
Step 2: Write the same journey as a flow
```yaml
# .autosana/login.flow.yaml
name: Login
instructions: |
Log in with test@example.com and password secret123.
Verify the home screen loads.
```
With Autosana: a flow describes what the user does and what they should see. The only required keys are name and instructions, and autosana flows validate checks the file before you push. Keys like ValueKey('email') stay out of the test entirely.
Step 3: Build for Autosana
# iOS Simulator: zip build/ios/iphonesimulator/Runner.app
flutter build ios --simulator
# Android: upload build/app/outputs/flutter-apk/app-debug.apk
flutter build apk --debug
Add --flavor to either command if your app uses flavors. For real iPhones, run flutter build ipa --export-method development, since builds with the default app-store export method fail to launch on Autosana's devices.
With Autosana: the Autosana build guide lists every Flutter command. iOS Simulator builds must be arm64, so build on Apple silicon.
Step 4: Run locally, then on every pull request
With Autosana: boot a simulator or emulator, then run autosana up --platform ios and autosana run login --local. The CLI detects every booted device, so iOS and Android run the same flow in one pass; this guide to Android emulator setup covers the first step. In CI, the Autosana GitHub Action uploads each build, and the GitHub bot runs the relevant flows and posts videos plus a GitHub Check on the PR.
Measure performance in the same runs
Integration tests can also verify performance: the Flutter docs include a profiling recipe that records frame timings while a test scrolls through a list.
With Autosana: every run captures memory, CPU and rendering metrics plus the network requests your app makes, so a slow screen shows up beside the step that triggered it.
The Flutter journey checklist
| Journey | What to verify | Tool that reaches it |
|---|---|---|
| Sign up and login | The user lands on the home screen | Any integration test tool |
| Location, camera or photo permissions | Allow and deny both lead somewhere sensible | Patrol or Autosana |
| Push notifications | The banner opens the right screen | Autosana or physical devices |
| In-app purchases | Premium unlocks, declines keep it locked | Store sandboxes or Autosana with RevenueCat Test Store |
| Small and large screens | Buttons stay reachable with the keyboard open | Any tool, on several simulators |
| Flavors | The test flavor talks to the test backend | Builds with --flavor |
The guides on push notification testing and in-app purchase testing cover the two hardest rows in depth.
Flutter integration testing examples
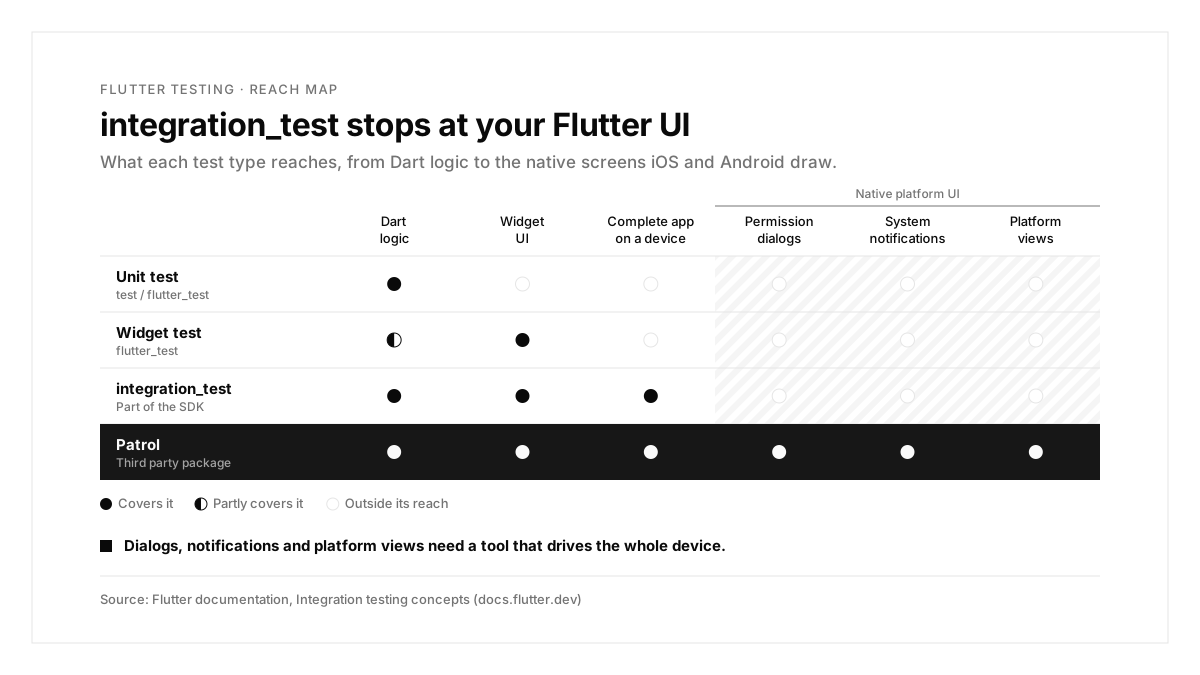
Each example starts from a failing run and traces it to a cause and a fix.
Example 1: The test stalls on a location prompt
Scenario: a store finder asks for location access on first launch. The integration_test run stops there.
| Step | Expected | What the run showed |
|---|---|---|
| Open the store finder | Permission prompt | Permission prompt |
| Allow location | Map with nearby stores | Prompt still on screen |
| Tap the nearest store | Store details | Test timed out |
Cause: the prompt is native platform UI, which integration_test leaves outside its reach.
Fix: move permission steps to a tool that drives the device, or grant the permission before the test starts.
With Autosana: push notification flows on Autosana cover the permission request, delivery and the tap, as this overview of push notification testing explains.
Example 2: A redesign breaks every login test
Scenario: the design team rebuilds the login screen. The journey stays identical, and 14 tests fail.
| Step | Expected | What the run showed |
|---|---|---|
| Find the email field | Field found | ValueKey('email') missing |
| Enter the password | Field filled | Skipped |
| Tap "Log in" | Home screen | Skipped |
Cause: the new widgets dropped the old keys.
Fix: treat keys as a public contract and review them in every UI pull request, or describe the journey instead of the widget tree.
With Autosana: flows adapt to UI changes as long as the user journey is intact, so the same login flow keeps passing after the redesign.
Example 3: Checkout passes on a large phone and fails on a small one
Scenario: the checkout test passes on an iPhone 16 Pro simulator and fails on an iPhone SE.
| Step | Expected | What the run showed |
|---|---|---|
| Enter the card number | Field filled | Field filled |
| Tap "Pay" | Order confirmation | Keyboard covers the button |
| Confirm the order | Order number shown | Checkout screen |
Cause: a fixed height column leaves the Pay button under the keyboard on short screens.
Fix: place the form in a scrollable view and test at least one small screen.
With Autosana: boot an iPhone SE beside an iPhone 16 Pro and an iPad, and one local run covers all three screen sizes.
Example 4: The test run creates real orders
Scenario: an integration suite passes, and the next morning the operations team finds twenty test orders in production.
| Step | Expected | What the run showed |
|---|---|---|
| Build the app for testing | Staging backend | Production backend |
| Place a test order | Order in staging | Order in production |
| Check the production order list | Real orders only | Twenty test orders mixed in |
Cause: the test build used the default flavor, which points at production.
Fix: build a dedicated test flavor with --flavor staging, and make the flavor visible on a debug screen the tests can assert on.
With Autosana: the Flutter build commands accept --flavor, so upload the staging flavor's Runner.app and .apk as the test builds.
Common Flutter integration testing problems and fixes
| Symptom | Likely cause | Fix |
|---|---|---|
| Run stalls on a system prompt | Native UI outside integration_test | Use a device level tool or pre grant the permission |
pumpAndSettle times out | A looping animation or loader | Pump for a fixed duration on that screen |
| Many tests fail after a redesign | Renamed or removed keys | Keep keys stable, or describe the journey |
| iOS build rejected by the cloud simulator | A device build or an x86_64 build | Use flutter build ios --simulator on Apple silicon |
| Real iPhone build fails to launch | Default app-store export method | Export with --export-method development |
| Linux CI fails before tests start | An X server is missing | Wrap the command in xvfb-run |
| Test data lands in production | The default flavor points at production | Build and upload a test flavor |
The Flutter integration testing process, summarized
| Step | What you do | Output |
|---|---|---|
| 1. Layer | Keep logic in unit tests, widgets in widget tests | A fast base suite |
| 2. Write | Cover each vital journey end to end | Login, core action, payment tests |
| 3. Build | Create simulator, APK and device builds | Runner.app, .apk, .ipa |
| 4. Run locally | Run on several screen sizes | A passing first run |
| 5. Automate | Run on every pull request | Results attached to each PR |
| 6. Diagnose | Trace each failure to its cause | A fix in the app or the test |
Conclusion
Flutter integration testing covers what unit and widget tests leave open: the complete app, on a device, with native UI and platform code in play. Use integration_test for pure Flutter journeys, reach for a device level tool when the OS takes over the screen, and trace every failing run back to its cause.
A good first step this week: build Runner.app and an APK, write your login journey as one Autosana flow, and run it on a small and a large screen.
FAQs
What is the difference between widget and integration tests in Flutter?
Widget tests check one widget in a test environment; integration tests run the complete app on a device.
Can integration_test tap permission dialogs?
The official package stays inside Flutter's UI; Patrol and Autosana interact with the whole device screen.
How do you run Flutter integration tests?
Run flutter test integration_test with a device connected or a simulator booted.
Which build does Autosana need for Flutter?
A zipped simulator Runner.app for iOS, an .apk for Android, or a development .ipa for iPhones.
Can integration tests run on real devices?
Yes. Connect a phone and run them there, or upload a development .ipa to a device cloud.
How many integration tests should a Flutter app have?
Start with 3 to 5 vital journeys: sign up, login, the core action and payment.