
Playwright Codegen: Record Tests, Pick Locators, Then Refactor
Playwright codegen explained: record tests from the CLI or VS Code, pick resilient locators, use emulation and saved login flags, then refactor the output.
- Written by
- Gautam Agarwal
- Read time
- 7 min read
- Published
Playwright codegen is Playwright's built-in test generator: it opens a browser and the Playwright Inspector, records your clicks and typing as test code, and picks a locator for each element you touch. It runs from the command line with npx playwright codegen or from the VS Code extension.
Codegen is the fastest way to get a first test and the best way to find a resilient locator. It is also easy to misuse. A recording captures one path through the app, exactly as you clicked it, with every stray click included. Treat the output as a draft that a person shapes into a maintainable test.
This guide covers running codegen, recording actions and assertions, how it chooses locators, the most useful CLI options, and how to refactor recorded code.
Key Takeaways
npx playwright codegen <url>opens a browser window plus the Playwright Inspector, which shows the generated code live.- Codegen prioritises role, text and test ID locators, and refines a locator when several elements match.
- The recorder can add three assertion types: visibility, text and value.
--save-storageand--load-storagelet you record a login once and start later recordings already signed in.- Emulation flags such as
--device="iPhone 13"and--viewport-sizerecord tests under specific screen conditions.
Running Codegen
Start the generator with the URL you want to test. The URL is optional; you can type it into the browser window instead.
npx playwright codegen demo.playwright.dev/todomvc
Two windows open. You interact with the site in the browser, and the Inspector writes the matching code as you go. When you finish, press Record to stop, copy the code into your editor, and close the windows. The Clear button starts a fresh recording.
If you prefer to stay in your editor, the Playwright test generator guide describes two VS Code flows: Record new, which creates a fresh spec file and records into it, and Record at cursor, which appends new actions to an existing test at the cursor position. Record at cursor is the more useful one for daily work, because it extends tests you already trust.
Recording Actions and Assertions
Codegen records actions such as clicks and form fills automatically. Assertions take one extra step: choose an icon in the toolbar, then click the element to assert against.
| Toolbar assertion | Generated check |
|---|---|
| Assert visibility | The element is visible |
| Assert text | The element contains specific text |
| Assert value | The element has a specific value, such as an input |
Add at least one assertion per meaningful step. A recording made only of actions proves the clicks worked, while the assertions prove the outcome.
How Codegen Chooses Locators
Locator choice decides whether a recorded test survives the next redesign. According to the Playwright docs, codegen analyses the rendered page and prioritises role, text and test ID locators. When multiple elements match, it improves the locator until it identifies the target uniquely.
That priority matches Playwright's own locator guidance, which recommends user-facing locators such as getByRole and getByLabel over CSS or XPath tied to DOM structure. You can also use codegen purely as a locator finder:
- Run codegen and press Record to stop recording.
- Click Pick Locator and hover over elements to see each locator highlighted.
- Click the element you want; its locator appears in the field next to the button.
- Edit it in place to fine-tune it, then copy it into your test.
This is often the best use of codegen on mature suites: let it propose a locator for a tricky element, then write the rest of the test by hand. For a wider view on where selectors are heading, see our article on browser testing with zero selectors.
Codegen CLI Options Worth Knowing"
| Option | What it does | Example |
|---|---|---|
--viewport-size | Records at a fixed window size | --viewport-size="800,600" |
--device | Emulates a device's viewport and user agent | --device="iPhone 13" |
--color-scheme | Records in light or dark mode | --color-scheme=dark |
--timezone, --geolocation, --lang | Emulates location and locale | --lang="it-IT" |
--save-storage | Saves cookies, localStorage and IndexedDB at the end | --save-storage=auth.json |
--load-storage | Starts the session from saved state | --load-storage=auth.json |
--user-data-dir | Uses a dedicated browser profile | --user-data-dir=/path/to/profile |
--http-credentials | Supplies HTTP Basic Auth | --http-credentials="user:pass" |
The storage pair saves the most time. Record the login once with --save-storage, then record every later flow with --load-storage, starting signed in. The saved file holds session data, so keep it local and add it to .gitignore.
For setups beyond what the CLI flags offer, such as recording while routing network requests, Playwright suggests launching a browser yourself, configuring the context, and calling page.pause() to open the codegen controls.
What a Recording Leaves Out
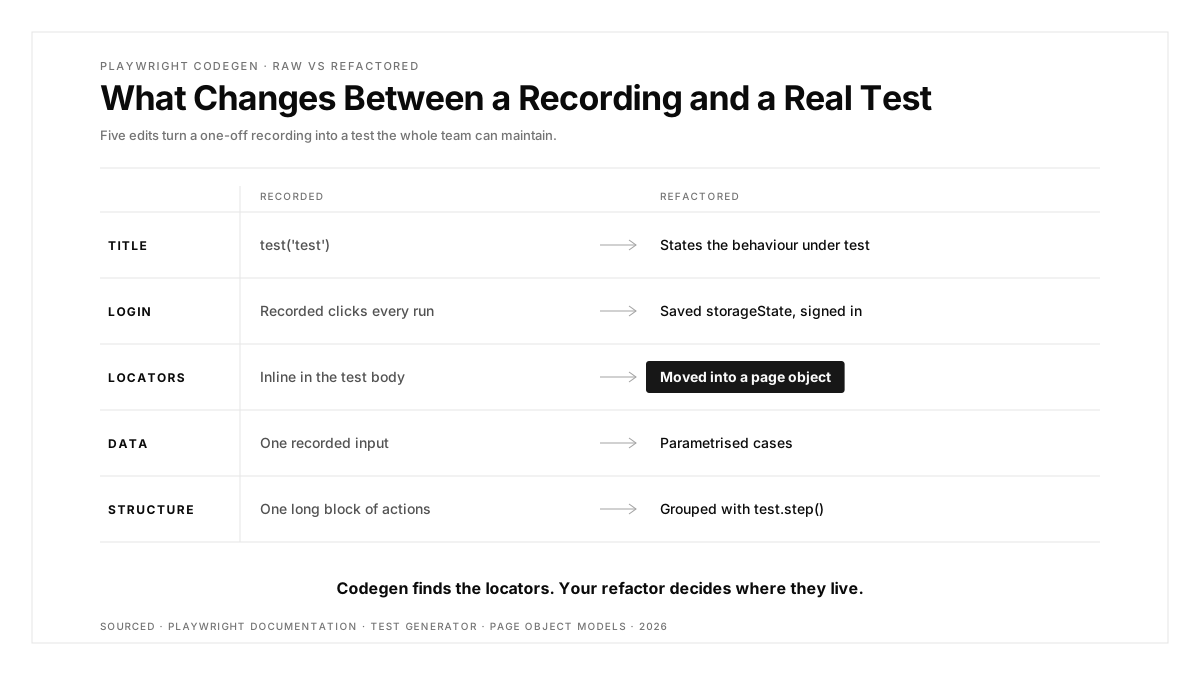
A recorder writes down what you did, in the order you did it. Plan to add the rest by hand:
- Intent. Recordings arrive with a generic title and one long body. Rename the test and group steps with
test.step(). - Reuse. Every recording repeats login and navigation. Move shared steps into page objects or fixtures.
- Data variation. A recording covers one input. Parametrise it to cover the cases that matter.
- Network control. API mocks with
page.routeare written by hand. - Noise. Stray clicks, focus changes and extra key presses get recorded too; delete them.
Refactoring a Recorded Test
Here is a typical raw recording:
import { test, expect } from '@playwright/test';

test('test', async ({ page }) => {
  await page.goto('https://shop.example.com/');
  await page.getByRole('link', { name: 'Sign in' }).click();
  await page.getByLabel('Email').click();
  await page.getByLabel('Email').fill('ada@example.com');
  await page.getByLabel('Password').fill('correct-horse-42');
  await page.getByRole('button', { name: 'Sign in' }).click();
  await page.getByRole('link', { name: 'Blue mug' }).click();
  await page.getByRole('button', { name: 'Add to cart' }).click();
  await expect(page.getByTestId('cart-count')).toContainText('1');
});
And the same test after ten minutes of refactoring, using a saved login state and a page object:
import { test, expect } from '@playwright/test';
import { ProductPage } from '../pages/product-page';

test.use({ storageState: 'playwright/.auth/user.json' });

test('signed-in shopper can add a product to the cart', async ({ page }) => {
  const product = new ProductPage(page);
  await product.open('blue-mug');
  await product.addToCart();
  await expect(product.cartCount).toHaveText('1');
});
The locators codegen found move into ProductPage, the login moves into stored state, and the title now states the behaviour under test. Our guide to regression suite maintenance explains why this step decides what a suite costs a year from now.
A Ten-Minute Codegen Workflow
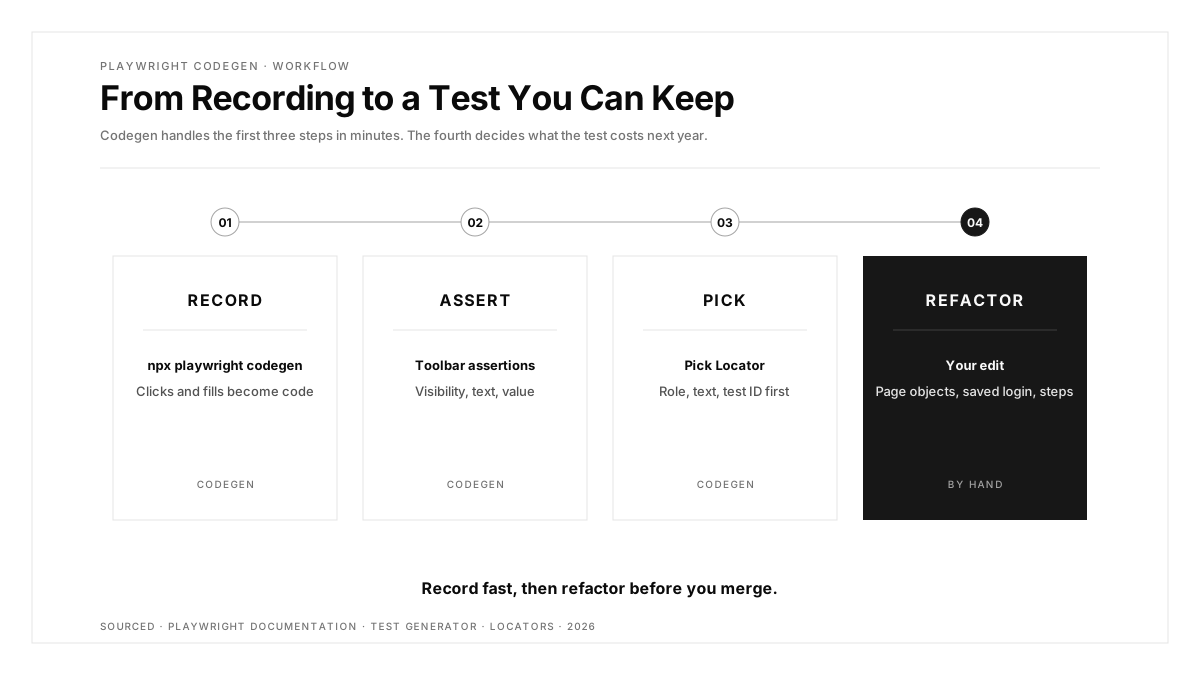
- Record the login once with
--save-storage=auth.json, and add the file to.gitignore. - Record the flow with
--load-storage=auth.json, adding an assertion after each meaningful step. - Copy the output into a new spec file and run it once to confirm it passes as recorded.
- Rename and structure the test with a behaviour-based title and
test.step()groups. - Extract locators into a page object, so the next recording can reuse them.
- Swap the login for a saved
storageStatein the test config. - Run it three times across Chromium, WebKit and Firefox before merging, to catch timing assumptions the recording hid.
When to Use Codegen
| Situation | Use codegen? |
|---|---|
| Learning Playwright's API and locator style | Yes, it teaches by example |
| Finding a resilient locator for a tricky element | Yes, with Pick Locator |
| Drafting a first test for a new flow | Yes, then refactor |
| Extending an existing test | Yes, with Record at cursor |
| Building a large suite from recordings alone | Prefer hand-written structure |
Recording tools sit on a spectrum with low-code and natural-language approaches; our comparison of and our look at natural language E2E tests cover the trade-offs. For the wider framework, start with our Playwright testing guide and our Playwright best practices.
Conclusion
Playwright codegen turns clicks into code and suggests locators that follow Playwright's own recommendations, which makes it the quickest route to a first test and a dependable locator finder. Its output is a draft: rename it, add assertions, move locators into page objects, replace the recorded login with saved state, and parametrise the data.
Use codegen to start fast, then refactor for the long run. Playwright covers web apps, so if your product also ships natively, our platform page shows how one flow can run across iOS, Android, the web, Chrome extensions and App Clips.
FAQs
What is Playwright codegen?
Playwright codegen is a built-in test generator that records browser actions as test code and suggests locators.
How do I run Playwright codegen?
Run npx playwright codegen followed by a URL, or use Record new in the VS Code extension.
Can codegen generate assertions?
Yes, its toolbar adds visibility, text and value assertions when you click an element.
Are codegen locators reliable?
Codegen prioritises role, text and test ID locators and refines them until each matches one element.
Can I record a test while logged in?
Yes, save a session with --save-storage, then start later recordings with --load-storage.
Should I use recorded tests as they are?
Treat recordings as drafts; rename them, add assertions and move locators into page objects before merging.