
How Do You Test a Mobile App, and in What Order?
A checklist tells you what to test. This is the order, why each gate sits where it does, and the three sequencing mistakes that cost whole releases.
Yuvan Sundrani · 27 min read
autosana.ai
TL;DR
Every guide to testing a mobile app gives you a list. The list is not the hard part, and lists are why teams still ship broken releases while believing they tested thoroughly.
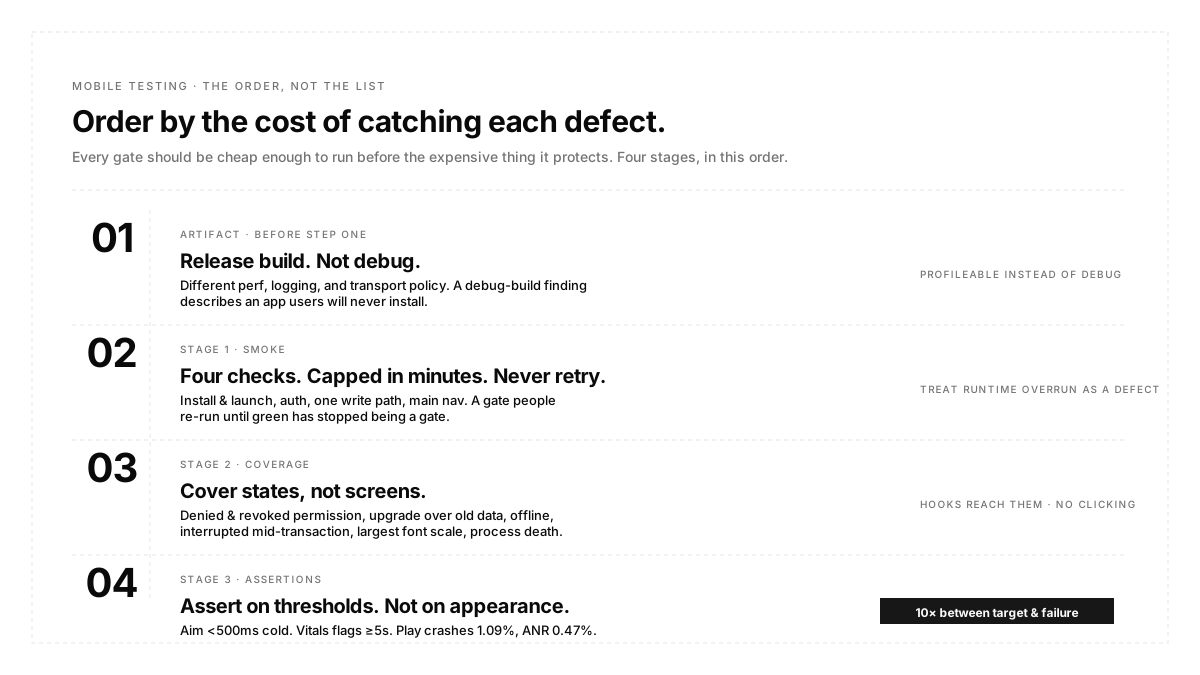
What matters is order. Each gate should be cheap enough to run before the expensive thing it protects, so a defect is caught at the earliest point that can catch it. Ordered that way, three mistakes stand out as the ones that actually cost releases: testing a debug build, which is a different application from the one users install; testing the fresh-install path and skipping the upgrade path, which is the one every existing user takes; and treating store submission as a formality at the end, when Google imposes a fourteen-day floor on some accounts and Apple runs a review queue.
A release goes out. Something breaks. The retrospective asks what was missed, and the honest answer is usually nothing: the check that would have caught it existed, it just ran at the wrong point, or against the wrong artifact, or after the decision it should have been informed.
That is the failure this post is about. Mobile testing is not short of activities to perform. It is short of a defensible order for performing them, and the order is what determines whether a defect costs ten minutes or a release cycle.
What follows is that order, with the specific reason each step sits where it does.
Before step one: what you are testing on
Two decisions precede everything, and getting either wrong invalidates the rest.
The artifact. Test the release build, not the debug variant. Google's performance guidance is direct: that debug builds have severe performance impact and that you should not measure performance on one; for devices on Android 10 and higher, make a release build profileable instead. The divergence goes past performance. A debug variant may permit cleartext traffic, expose backup data, and log material the release build does not, so a security or transport finding from a debug build describes an application nobody will install.
The device tier. Virtual devices for volume, hardware for the categories they cannot reach. Apple is unusually blunt about where the line falls: the Simulator does not use a tile-based deferred renderer, does not provide a pixel-accurate match to the graphics hardware, and rendering performance in it has no relation to performance on an actual device. Motion sensors, cameras and microphones, proximity sensors, barometers, and ambient light sensors are simply absent, and it does not deliver push notifications or raise privacy alerts for Photos, Contacts, Calendar, and Reminders. That last item means your permission-request branch never executes there.
Step 1: Gate on a smoke suite, capped in minutes
Smoke runs first because its only job is deciding whether the rest is worth running.
Four checks cover most apps: the app installs and launches, authentication completes, one write path reaches the backend and returns, and the main navigation renders. Four to eight tests, not thirty.
Two rules make it function as a gate rather than a report. Cap the runtime, five minutes being a reasonable default, and treat exceeding the cap as a defect in the suite. And never retry in this tier, because a gate that people re-run until green has stopped being a gate. Xcode's retry flags are a legitimate diagnostic, but as a blanket setting they destroy your ability to measure flakiness: the result bundle records a test that failed then passed as passed and counts it once, while downstream converters have counted retried tests once per attempt, so your reported number and your real number diverge.
Group the four as a suite and fire it with an automation on every new build.
Step 2: Cover states, not screens
Screen coverage is what most functional passes actually measure, and it is not the same as behaviour coverage. Each of these is a distinct app state with its own code path:
| State | Why It Breaks |
|---|---|
| Permission denied at the prompt | The fallback path is rarely built with care |
| Permission granted then revoked | The app holds a cached handle to something it lost |
| Upgrade over a previous version | Migration runs, and only for existing users |
| Fresh install | Different path from upgrade, and the only one usually tested |
| Offline, and slow rather than offline | Timeouts and partial responses, not clean failure |
| Interrupted mid-transaction | Call, notification, or backgrounding during a write |
| Largest supported font scale | Clipping and overlap that default settings hide |
Two of these deserve emphasis because they are chronically skipped. The upgrade path reaches every existing user at once and touches none of your new ones, so it is simultaneously the highest-blast-radius path and the one a clean test device never exercises. And revoked permission is a different state from denied: the app already succeeded once and cached something it no longer has rights to.
Hooks that call an API or run a script are how you reach these states without clicking through to them, which matters because six screens of navigation before an assertion adds six ways to fail before the thing under test.
Step 3: Force process death, and force it correctly.
This is the single most commonly mis-executed test in mobile QA, and the mistake inverts the result.
Testers verify eviction by swiping the app away from recents. That does not test eviction. Android's documentation states that a saved state is tied to the task stack, that the task stack is destroyed by force stopping, removing from recents, or rebooting, and that a saved state is not restored in user-initiated dismissal scenarios while it is restored in system-initiated ones.
So swiping tests a cold start. The restoration path, where the system hands your app a bundle and expects it to reconstitute, is untouched.
To force it properly: enable Don't keep activities in Developer Options, which destroys every activity as soon as you leave it, or kill the process directly with adb while leaving the task stack intact. Then check two things the framework will not do for you. Views without an assigned id are not tracked, and their state is not restored. And a ViewModel survives configuration changes but is destroyed by system-initiated process death, which is why a screen can pass a rotation test and fail an eviction test while looking identical from the outside.
Step 4: Cross the process boundary deliberately.
Espresso runs inside your app's process and cannot reach outside it. That boundary is a design decision, not a gap, and it defines which tool handles which step.
Espresso's advantage is synchronization: it waits for the main thread message queue and the default AsyncTask pool to go idle before acting. Its limit is exactly that scope. Android's own documentation notes that because Espresso is not aware of other asynchronous operations, including those on a background thread, it cannot provide its synchronization guarantees there. Since almost nobody uses AsyncTask now, work in coroutines, RxJava, or a custom executor is invisible, and the test races the app.
Anything outside the app needs UiAutomator, whose UiDevice can change rotation, press hardware keys, press Back, Home, or Menu, open the notification shade, and take a screenshot. That covers system permission dialogs, notification taps, manufacturer popups, and cross-app redirects. Both are built on Instrumentation, so mixing them in one test class is ordinary rather than a workaround. Compose needs its own rule as a third participant, because it maintains a semantics tree rather than a View hierarchy for Espresso's matchers to walk.
Step 5: Assert on thresholds, not on appearance.
A boolean check asks whether the screen appeared. The platforms grade on numbers, and there are two sets that get conflated.
| Start Type | Android Vitals Calls Excessive At | Google's Guidance Targets |
|---|---|---|
| Cold | 5s or longer | under 500ms |
| Warm | 2s or longer | under 200ms |
| Hot | 1.5s or longer | under 150ms |
The failure bar is roughly ten times looser than the target. A build cold-starting in nine seconds passes a launch check and misses the store's own bar by nearly double.
The criterion almost nobody measures is in the same guidance: P95 and P99 should sit very close to the median, because a wide tail indicates lock contention or unnecessary I/O on the startup path rather than uniform slowness. For rendering, a 60Hz frame budget is 16.7ms, and Google recommends targeting 90Hz since many devices run at that rate during scrolling.
On stability, Play's overall bad behavior thresholds are a 1.09% user-perceived crash rate and a 0.47% user-perceived ANR rate, with an 8% per-phone-model threshold. Exceeding them affects discoverability, which makes these commercial numbers rather than engineering preferences.
Autosana's performance monitoring captures memory, CPU, and frame rendering, including slow frame counts and render time percentiles on every run, which is the data the percentile criterion needs. Startup timing is not in that set and belongs to Android vitals in the field and a benchmarking library in the lab.
Step 6: Turn on the checks you already own.
Three free sources of coverage that most teams never enable.
Accessibility checks inside your existing suite. Enabling the Accessibility Test Framework in Espresso makes checks run before every view action your tests already perform, with no new tests written. Errors fail the test by default. Real output from Google's codelab reports a view missing speakable text needed for a screen reader and a view below the minimum touch target size, giving 48 by 48 dp required against 24 by 24 dp actual. Set run-checks-from-root-view to true so the whole screen is examined rather than only the view you tapped, and suppress specific known issues rather than categories so new problems still surface.
The Play pre-launch report. Uploading a build to any test track triggers an automated crawl on real devices, free. It grades findings as errors including crashes, ANRs, and restricted API use; warnings including slow startup and sign-in problems; and minor issues including missing content labels and small touch targets. Every crawled screen is captured as a screenshot with replayable video per device, and when a crash there also appears in Android vitals, Play links them so you can see field impact. Guide the crawler past login by supplying credentials identified by Android resource name, or by recording a Robo script in Android Studio, which needs no Firebase account.
Network capture on runs you already do. Confirming that a call actually fired, and over the endpoint you expected, is cheaper than inferring it from a rendered screen. Network traffic capture records method, URL, status, and timing per request.
Step 7: Run the hardware-only categories on hardware.
By this point the virtual tiers have caught what they can. What remains genuinely requires devices:
Rendering performance and jank, because Apple states the Simulator figure bears no relation. Startup and thermal behavior. Camera, microphone, and scanning. Biometrics is beyond a mocked success callback, since the Secure Enclave is not virtualized. Bluetooth, NFC, and contactless payment. Real GPS drift. Push delivery end to end. And on Android, background survival, which is the one that needs specific manufacturers rather than just any hardware: Huawei stops an unprotected foreground service within five to ten minutes of the screen being off, Samsung kills apps with no foreground activity for three days and can reset a battery exemption on OTA, and Xiaomi resets autostart after updates and reboots. There is no API to query any of it.
Real device testing covers the cloud hardware half, and multi-device testing handles journeys spanning a sender and a receiver.
Step 8: Trigger regression on cause, not on diff size.
Change-impact selection, meaning run the tests for your diff touches, is the default and is valid for exactly one case.
| Trigger | Scope | Why |
|---|---|---|
| Source-only pull request | Change-impact subset | The one case impact analysis is valid for |
| Lockfile change | Full suite | Resolution moved dependencies you never named |
| targetSdk or min-iOS change | Full suite at the new API level | The platform gates behaviour on exactly this |
| Config or flag deploy | Affected journeys, flag pinned | Behaviour changed with no app diff |
| Nightly | Full suite, wide devices | Net under everything above |
The targetSdk row is the clearest illustration. Android 13 introduced the notification posting permission, and behavior branches on the value your app targets: at 32 or lower the OS prompts, at 33 or higher you must request it, and if it is not granted, the OS silently drops your notifications. A one-line bump changes whether notifications arrive, and a diff-derived selector sees one Gradle line with no mapped tests.
Worth knowing how much of your red is real before acting on any of this. Google's analysis found 84% of transitions from pass to fail involved a flaky test rather than a genuine breakage, and that only 1.23% of tests ever found a breakage at all.
Step 9: Start the store gates before you need them.
Submission is treated as the last step and behaves like a dependency with weeks of lead time.
On iOS, internal testing reaches up to 100 App Store Connect users with no review, while external testing reaches up to 10,000 but requires Beta App Review on the first build of each version. Every TestFlight build expires 90 days after upload, and when it expires, testers lose the app along with its local state.
On Android, personal developer accounts created after 13 November 2023 must run a closed test with at least twelve testers opted in continuously for fourteen days before applying for production access. That is a floor on the calendar, not a testing policy, and the clock runs on continuous opt-in, so a cohort dropping below twelve resets eligibility rather than pausing it.
Put both on the schedule before assigning acceptance criteria to anyone.
The three sequencing errors
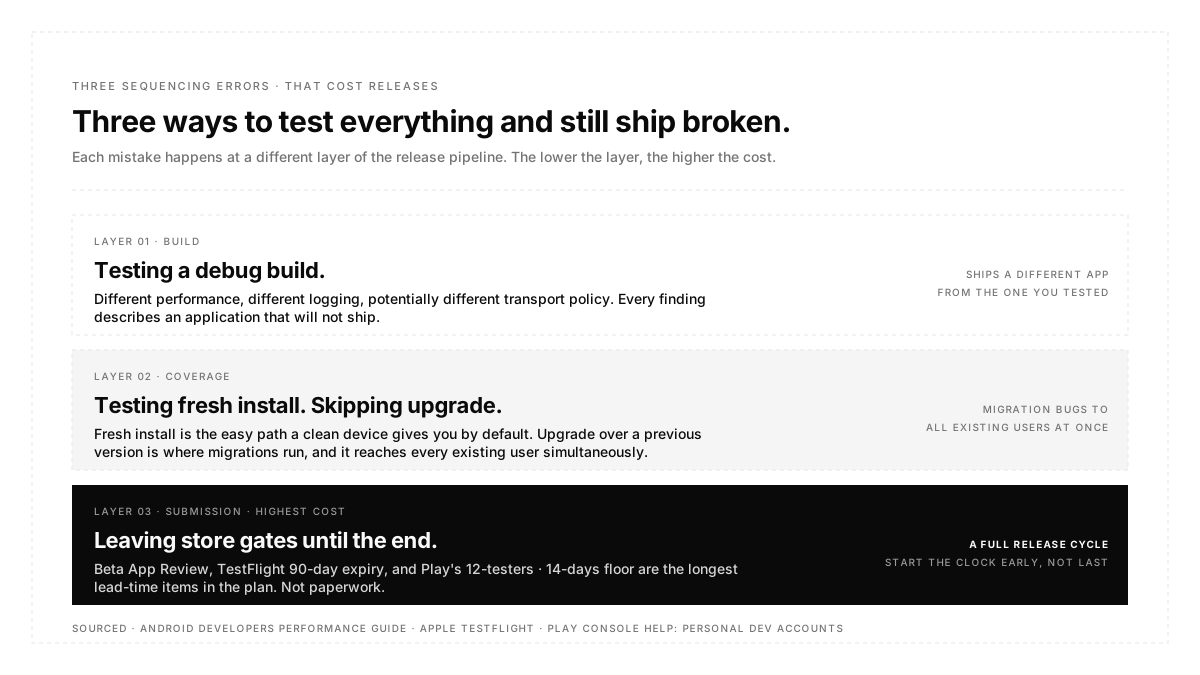
Testing a debug build. It has different performance, different logging, and potentially different network policies. Every finding describes an application that will not ship.
Testing fresh install only. It is the easy path and the one a clean device gives you by default. Upgrading over a previous version with real data is where migrations run, and it reaches your entire existing user base simultaneously.
Leaving store gates until the end. Beta review latency and a mandatory fourteen-day window are not paperwork. They are the longest-lead-time items in the plan and they belong at the front of it.
Conclusion
Testing a mobile app well is less about knowing what to check than about knowing when each check earns its cost. Order by how early a defect can be caught and how expensive it becomes if it is not: gate on a fast smoke suite, cover states rather than screens, force the conditions a clean device never enters, assert against the numbers the platforms publish rather than against whether a screen appeared, turn on the free coverage you already own, reserve hardware for what only hardware answers, and start the store clock before it becomes the critical path. Get the sequence right, and most of the list takes care of itself.
FAQ
What is the correct order to test a mobile app?
Verify the artifact and device tier first, then smoke as a blocking gate, then state coverage, process death, cross-boundary interactions, threshold assertions, free automated checks, hardware-only categories, regression triggers, and store gates started early rather than last.
Should I test on a debug or release build?
Release. Debug variants differ in performance, optimization, logging, and network policy, and Google's guidance explicitly warns against measuring performance on one. Make a release build profileable instead.
How do I test the process of death properly?
Enable Don't Keep Activities in Developer Options or kill the process with adb, leaving the task stack intact. Do not swipe from recents, which destroys the task stack and discards saved state, testing a cold start rather than restoration.
What should be in a smoke suite?
Install and launch authentication, one write path that reaches the backend, and main navigation. Four to eight tests, capped in runtime, never retried.
How much can be tested on an emulator or simulator?
Most functional and layout work. Not rendering performance, since Apple states simulator rendering bears no relation to device performance. Not sensors, biometrics, radios, push delivery, or Android manufacturer power management.
What performance numbers should I test against?
Aim for cold start under 500 ms, warm under 200 ms, hot under 150 ms, with P95 and P99 close to the median. Android vitals only flags excessive at five, two, and 1.5 seconds, respectively, which is a far looser bar than the target.
How early should I start store submission?
Before the test plan is finalized. Beta App Review gates external iOS testers, TestFlight builds expire after 90 days, and many Android accounts face a mandatory fourteen-day closed test with twelve continuously opted-in testers.
How do I know whether a failing test is a real defect?
Assume less of it is real than it looks. Google found 84% of pass-to-fail transitions came from flaky tests rather than breakages. Track attempt counts rather than final status, and never retry in a gating tier, or you lose the ability to tell.