
Android Test Automation: Espresso or UiAutomator?
Espresso cannot leave your app process, UiAutomator can, and Play runs a free crawler on real devices you may not be using. How the stack fits.
Yuvan Sundrani · 13 min read
autosana.ai
Key takeaways
- Espresso runs inside your app's process and cannot reach anything outside it. Permission dialogs, OEM popups, the notification shade, and cross-app redirects are all beyond it by design.
- UiAutomator can reach all of those through the accessibility layer, which is why it is slower and why Google's own documentation still recommends Espresso for ordinary in-app tests.
- The two are both built on instrumentation, so combining them in one test class is the normal arrangement rather than a workaround.
- Jetpack Compose needs its own test rule, because Compose has no view hierarchy for Espresso's matchers to walk.
- Google runs a free automated crawl of your app on real devices every time you upload a build to a test track and reports crashes, ANRs, startup warnings, accessibility issues, and security findings. Most teams never open it.
There is a moment in almost every Android automation project where a test that has worked for months suddenly cannot proceed. The app asks for permission, a dialog appears, and Espresso cannot see it. Nothing is broken. The dialog belongs to the system, and Espresso was never able to touch the system.
That moment is worth understanding properly, because it is not a limitation anyone forgot to fix. It is the boundary that separates Android's testing frameworks from each other, and knowing which side of it you are on explains most of what follows: why Espresso is fast, why UiAutomator is slow, why Compose needed something new, and why Google gives away an automated crawl of your app on real hardware for free.
What is Android test automation?
Android test automation is running tests against an Android app without a person operating the device. In practice it spans three layers: local unit tests running on the JVM, instrumented tests running on a device or emulator with access to the Android framework, and end-to-end journeys that behave like a user.
This post is about the instrumented and end-to-end layers, because that is where the framework choices are and where the cost lives.
The process boundary that explains everything
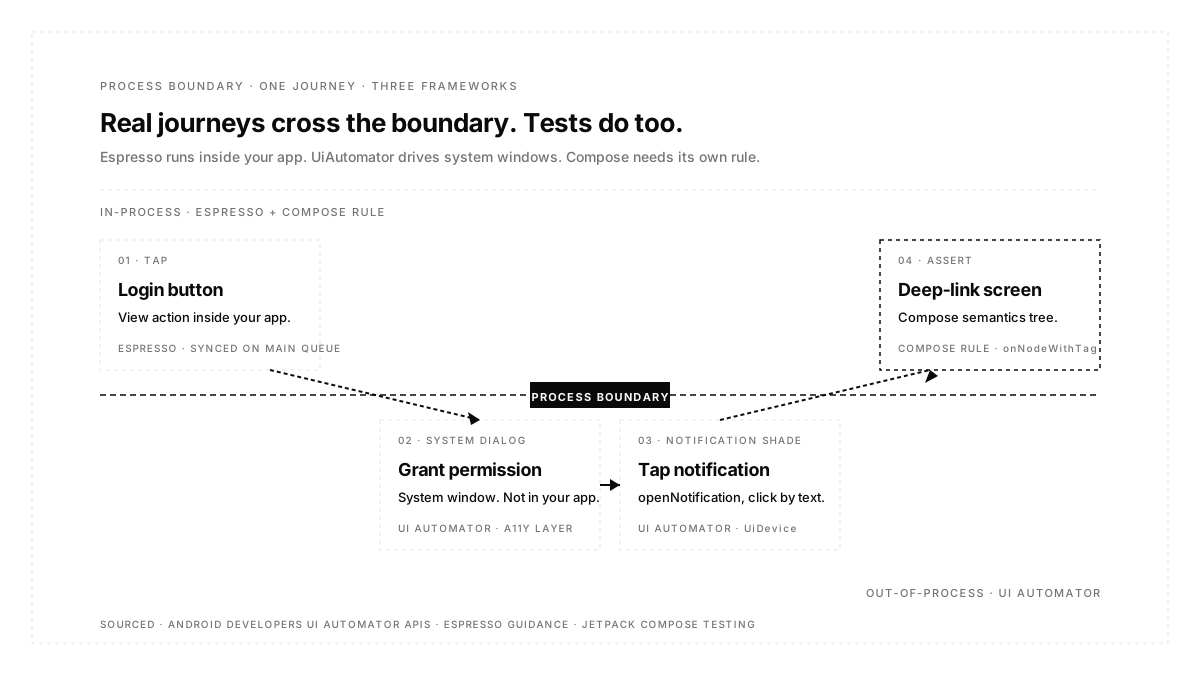
Android's automation frameworks divide on one question: does the test code run inside your app's process or outside it?
Inside is espresso. It executes in the same process as the app under test, which means it has access to the app's internals. It can see the view hierarchy directly, reach objects the app holds, and most importantly, it can observe whether the app is busy.
Outside is UiAutomator. It drives the device through Android's accessibility layer, the same channel a screen reader uses. It has no privileged view of your app and does not need one, which is exactly why it can operate on any app on the device, including ones you did not write.
Everything downstream follows from that. In-process access buys speed and synchronization. Out-of-process access buys reach. Neither can have both, and the reason teams end up running both frameworks is that a real user journey crosses the boundary constantly.
Worth noting how Appium's own drivers describe this distinction, since it is unusually clear: their UiAutomator2 driver is black-box, while their Espresso driver is grey-box, because although the driver exposes no internals to the test author, the underlying Espresso framework does have access to the application's internals. That access is what lets Espresso find elements that are not currently rendered on screen and identify elements by Android View Tag.
Espresso: fast because it knows when to wait
Espresso's defining feature is not its matcher syntax. It is synchronization.
Because it runs in process, Espresso can wait for the app's main thread message queue to drain and for the default AsyncTask pool to finish before it performs the next action. That eliminates the entire category of failure where a test taps a button that has not rendered yet, and it is why an Espresso suite typically needs no explicit waits at all for ordinary flows.
The limit is precise and worth stating exactly: Espresso is not aware of asynchronous work outside those two mechanisms. Coroutines, RxJava, and custom thread pool executors are invisible to it. Since almost nobody writes AsyncTask any more, the practical consequence is that a modern app doing network work in coroutines will race its own tests unless you register idling resources, which means shipping test awareness inside production code.
Google's guidance is unambiguous about where Espresso belongs. The documentation states that UiAutomator and Espresso have some feature overlap, but that Espresso has more synchronization mechanisms and is therefore preferred for common UI tests. Reach for UiAutomator when you need to leave the app, not as a general-purpose alternative.
UiAutomator: everything outside your app
UiAutomator's central object is UiDevice, which represents the device itself rather than your app. Through it a test can change the device rotation, press hardware keys such as volume up, press the Back, Home, or Menu buttons, open the notification shade, and take a screenshot of the current window.
That list is short, and it covers most of what teams actually need it for:
System permission dialogs. The first-run permission prompt is a system window. Espresso cannot dismiss it, so either UiAutomator handles it or you grant permissions ahead of the test through a grant rule or an adb command.
Notifications. Opening the shade, finding a notification by text, and tapping it to verify a deep link is a canonical UiAutomator flow, and it is the only way to test that path end to end.
Manufacturer popups. Battery optimization prompts and other OEM-specific dialogs appear on some devices and not others, which makes them a recurring source of failures that reproduce only on particular hardware.
Cross-app journeys. A share sheet that opens another app, an authentication redirect to a browser, or a payment app handoff all leave your process, and a test that follows the user has to leave with them.
Because UiAutomator works through the accessibility layer rather than direct instrumentation, it is slower, and it is black-box. It finds elements by resource id, text, or class name, with no access to your source. And since both frameworks are built on instrumentation and run through JUnit, mixing them in a single test class is ordinary practice: Espresso for the in-app steps, and UiDevice for the step that crosses the boundary.
Jetpack Compose needs its own rule.
Compose broke an assumption underneath Espresso. Espresso's matchers walk a View hierarchy, and Compose does not build one. It maintains a semantics tree instead, which is a parallel structure describing what is on screen for accessibility and testing purposes.
So Compose ships its own test rule, with node finders such as onNodeWithText and onNodeWithTag, and its own synchronization via waitForIdle. Using test tags is worth adopting early, because a tag is a stable identifier you chose rather than a piece of display text that a copy change will break.
The practical pattern in a mixed app is three frameworks in one test: the Compose rule for Compose screens, Espresso for any remaining view-based screens, and UiDevice for the system interaction. A notification test looks like opening the shade with UiDevice, tapping the notification, and then asserting with the Compose rule that the expected screen is displayed.
The free device lab you are probably not reading
This is the most under-used thing in Android testing, and it costs nothing.
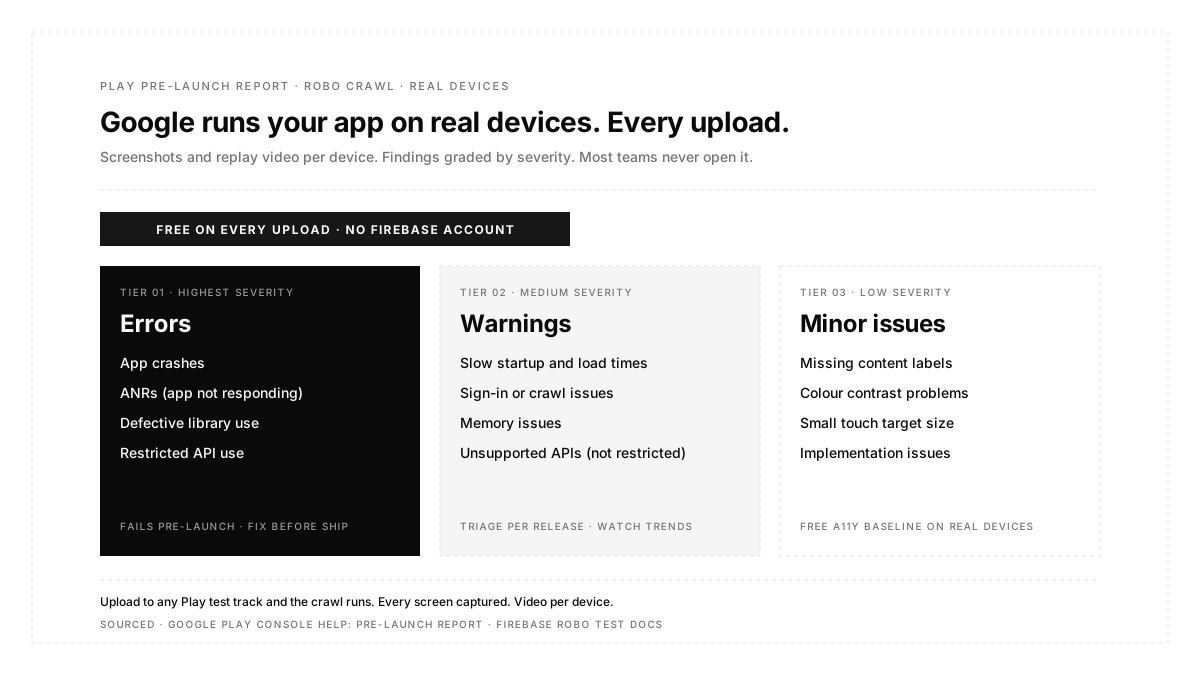
When you upload an app bundle or APK to a Play test track, Google automatically installs it on a set of real Android devices in their test lab and crawls it for several minutes with an automated crawler called Robo, which taps, swipes, and types the way a user would. The result is a pre-launch report, generated for free, subject to capacity in the device lab.
What it reports is more specific than most teams expect. Findings are graded into three levels:
Errors include crashes, ANRs, use of defective libraries, and use of unsupported APIs that have been restricted.
Warnings include slow startup and load times, sign-in or crawl issues, memory issues, and use of unsupported APIs that are not yet restricted.
Minor issues include missing content labels, color contrast problems, small touch target sizes, and implementation issues.
The accessibility section alone is worth the visit, since it separates findings into content labelling, meaning elements labelled incorrectly for screen readers, touch target size, and implementation issues that make the app difficult to use for people with motor impairments. Getting that for free on real hardware is a better accessibility baseline than most teams build deliberately.
Two details make it more useful than a passive report. Every crawled screen is captured as a screenshot, and each crawl can be replayed as video per device, so a crash comes with a visual record of what Robo did to cause it. And when a crash in the pre-launch report also appears in Android vitals, Play links the two, so you can see the field impact of that crash and prioritize accordingly rather than guessing.
Making Robo useful rather than random
An unguided crawl explores whatever it can reach, which usually means it never gets past your login screen. Three controls fix that.
Provide credentials and text input. Robo supports test account sign-in and can enter predefined text into fields, which you specify by identifying the EditText field using its Android resource name. Without this, everything behind authentication is invisible to the crawl.
Record a Robo script. You can record one in Android Studio under Tools, Firebase, Test Lab, and Record Robo Script and load it into your pre-launch report settings. When a script is attached, the crawler performs your scripted actions first and then explores the app as usual, so you get a guaranteed path through a key journey plus unguided exploration afterwards. Notably, you do not need a Firebase account to create a Robo script.
Register your deep links. Add them in the pre-launch report settings, and the crawler will exercise them during the test, which covers an entry point that unguided crawling would never find.
If you want more control than the Play Console offers, the same crawler is available directly in Firebase Test Lab, where you can target specific devices, locales, or Android versions and run for longer durations.
The honest limit is that Robo is exploration, not verification. It finds crashes and obvious defects because it pokes at everything, but it does not know what your app is supposed to do, so it cannot tell you a checkout produced the wrong total. It complements a scripted suite and does not replace one.
Device strategy for Android fragmentation
Exhaustive coverage is impossible, so this is a sampling problem with three inputs.
Your own analytics first. The top ten devices in your install base beat any generic recommendation list, and they will usually include hardware nobody on the team owns.
The oldest OS version you support. Android gates a great deal of behavior on the version an app targets, so an app can behave differently across API levels with no source change at all. Testing only on current releases means those gates are untested.
At least one low-end device. Memory pressure, thermal throttling, and slow storage produce timing failures that a flagship will never reproduce, and they are the failures your largest user segment experiences in many markets.
Emulators cover the bulk of functional work because they are fast and parallel. Real hardware is required for anything touching the GPU, camera, sensors, biometrics, push delivery, or manufacturer software layers. Autosana runs flows on real iOS and Android devices in the cloud for that half and on two devices at once, where a journey spans a sender and a receiver.
Best practices
Set permissions before the test rather than dismissing dialogs during it. Granting up front removes a system interaction from every test that does not exist to test permissions, and permission denial then becomes its own deliberate case rather than an accident.
Use test tags and content descriptions, not display text. Text changes when someone edits copy, and that breakage arrives looking exactly like a defect. This is the same discipline Autosana's instruction-writing guidance argues for at the journey level: bind to intent, not to presentation.
Seed state through the back door. Reaching a state by tapping through six screens adds six ways to fail before the assertion. Hooks that call an API or run a script land the state directly.
Read the pre-launch report on every release. It is generated whether or not you look, and it runs on hardware you do not own.
Keep system interaction in as few tests as possible. Every crossing of the process boundary is slower and more fragile, so isolate it rather than spreading it through the suite.
Conclusion
Android gives you three testing frameworks and one line running between them, which is whether the test executes inside your app's process. Espresso trades reach for speed and synchronization, UiAutomator trades speed for the ability to touch the system, Compose needs its own rule because it has no view tree, and real journeys cross all three. Choose per step rather than per project. Then open the pre-launch report, because Google is already running your app on real devices every time you upload a build, and the accessibility and stability findings sitting in there are free.
FAQ
Espresso or UiAutomator?
Espresso for anything inside your app, because it synchronizes with the app and is faster. UiAutomator when the test must leave the app, meaning system dialogs, notifications, settings, or another application. Most real suites use both in the same test class.
Can Espresso handle permission dialogs?
No. They are system windows outside your app's process. Either grant permissions before the test with a grant rule or an adb command, or dismiss the dialog with UiAutomator.
Does Espresso work with Jetpack Compose?
Not directly for Compose content, because Compose maintains a semantics tree rather than a View hierarchy. Compose has its own test rule and node finders, and the two can be used together in one test for apps with both kinds of screen.
Why do my Espresso tests flake despite automatic synchronization?
Because that synchronization covers the main thread message queue and the default AsyncTask pool, and nothing else. Work in coroutines, RxJava, or a custom executor is invisible to Espresso unless you register an idling resource.
Is the Play pre-launch report worth using?
Yes, and it is free. It runs on real devices and reports crashes, ANRs, startup warnings, accessibility issues, and security findings, with screenshots and video per device. It is exploration rather than verification, so it supplements a scripted suite.
How do I get Robo past my login screen?
Supply test account credentials and predefined text, identifying each field by its Android resource name, or record a Robo script that performs the sign-in first. The crawler runs scripted actions before exploring on its own.
Do I need Firebase to record a Robo script?
No. Scripts are recorded through Android Studio's Firebase tooling and loaded into Play Console pre-launch report settings without a Firebase account.
How many Android devices should we test on?
Enough to cover your top devices by install base, your oldest supported OS version, and at least one low-end device. That is usually eight to fifteen configurations, and the list should come from your analytics rather than from a generic device chart.